
Posts Tagged ‘dog’

Alabama Rot: What is it?

The autumn and winter are a risk time for Alabama Rot, or more properly CRGV, although there were still some cases being picked up in the summer. In this blog, we’re going to look at this mysterious disease in a little more detail.


What’s with the name?

Strictly speaking, Alabama Rot was a condition of racing greyhounds in the USA in the 1980s, and was linked to contaminated feed. However, you will commonly hear people using the term to refer to a modern disease in the UK. Technically, the condition being diagnosed in Britain at the moment is Cutaneous and Renal Glomerular Vasculopathy, or CRGV. However, because “Alabama Rot” sounds scary, it sells more newspapers and hence it’s the name the media have chosen! As a result, that’s what most people call it.

But what actually is it?

It’s a disease that causes blood clots to form in the small blood vessels – typically in the skin and in the kidneys. These clots prevent blood from flowing to the local tissues, so they become starved of oxygen and die, resulting in symptoms.

What are the symptoms?

The first symptoms are ulcers – non-healing wounds that open up without injury. They usually affect the lower legs, but occasionally are seen on the underside of the belly, on the muzzle, or even in the mouth. They can easily look like scrapes or cuts. In the more severe cases, within 7-10 days, the kidneys start to fail, resulting in lethargy, reduced urine production, dehydration, vomiting, a metallic smell on the breath, collapse, and ultimately – in all too many cases – death. This is technically termed “acute kidney injury”, or AKI.

What is the treatment?

The key to treatment is early diagnosis, and then supportive care to help maintain kidney function. This is typically with hospitalisation and aggressive intravenous fluid therapy, keeping affected animals on a drip and managing their symptoms. However, sadly, in many cases kidney failure develops, and often it is so rapid, as to be untreatable, and many of these dogs are put to sleep to prevent further suffering.

What causes it?

No-one knows. Similar conditions are seen with some bacterial infections (e.g. some types of toxic E. coli), but if so, the bacterial cause has not yet been discovered. It has been suggested that a fish bacterium (Aeromonas hydrophila) might be responsible, but this has not been confirmed. Other possibilities that have been raised include food contamination, viral infections, or even a toxin in the environment, but so far there’s no evidence for these.

How can it be prevented?

Again – as we don’t know the cause, we don’t know! Initially, some people were recommending bathing those parts of your dog which become wet or muddy on a walk, but although this will help you detect the ulcers early, we have no evidence to suggest that it would prevent the disease. Some people are also avoiding walking their dogs in certain areas – but although an environmental cause has been suggested, there is no firm evidence as yet that particular areas are transmitting the disease, and most of the dogs affected have walked in areas where hundreds of others go, without the others being affected.

What animals are at risk?

Potentially any dog could develop the condition. That said, if one dog in a household is affected, others seem to be at higher risk – but once more, we do not know why. Fortunately, the disease cannot jump the species barrier, and there have been no reports of cases in humans, cats or other animals.

Should I be worried?

Not unduly so, no. Although CRGV is a very unpleasant disease, from the start of the “outbreak” in 2012 to January this year, there were only 122 confirmed cases – despite there being about 9 million dogs in the UK! It’s a really rare condition, and not something to panic about – especially when we compare it to infectious diseases like Parvo, degenerative ones like heart failure, and injury from cars, which kill many thousands of dogs each year.

What should I do?

Check your dog regularly for unexplained redness or sores on the skin. While most of these won’t be CRGV (again, we’d like to emphasise that it’s really rare!), they are potentially a warning flag. Early diagnosis gives the maximum chance for a successful outcome, so be vigilant, but do not be afraid!
If you find any suspicious lesions, or you’re at all concerned about your dog’s health, give your local Goddard Vet a ring for advice!

A simple guide to applying ear drops to your dog

Applying ear drops to your dog can be a daunting task for any pet owner. However, with the proper knowledge and technique, administering ear drops to your furry friend can be a simple and stress-free process.

In this guide, our very own vet, Victoria, will walk you through the proper way to apply ear drops to your dog. This includes how to properly clean the ear, the best way to administer the medication, and how to monitor your dog’s recovery. With the right approach and care, you can ensure that your dog receives the treatment they need to maintain its ear health. So, let’s get started!

Before application

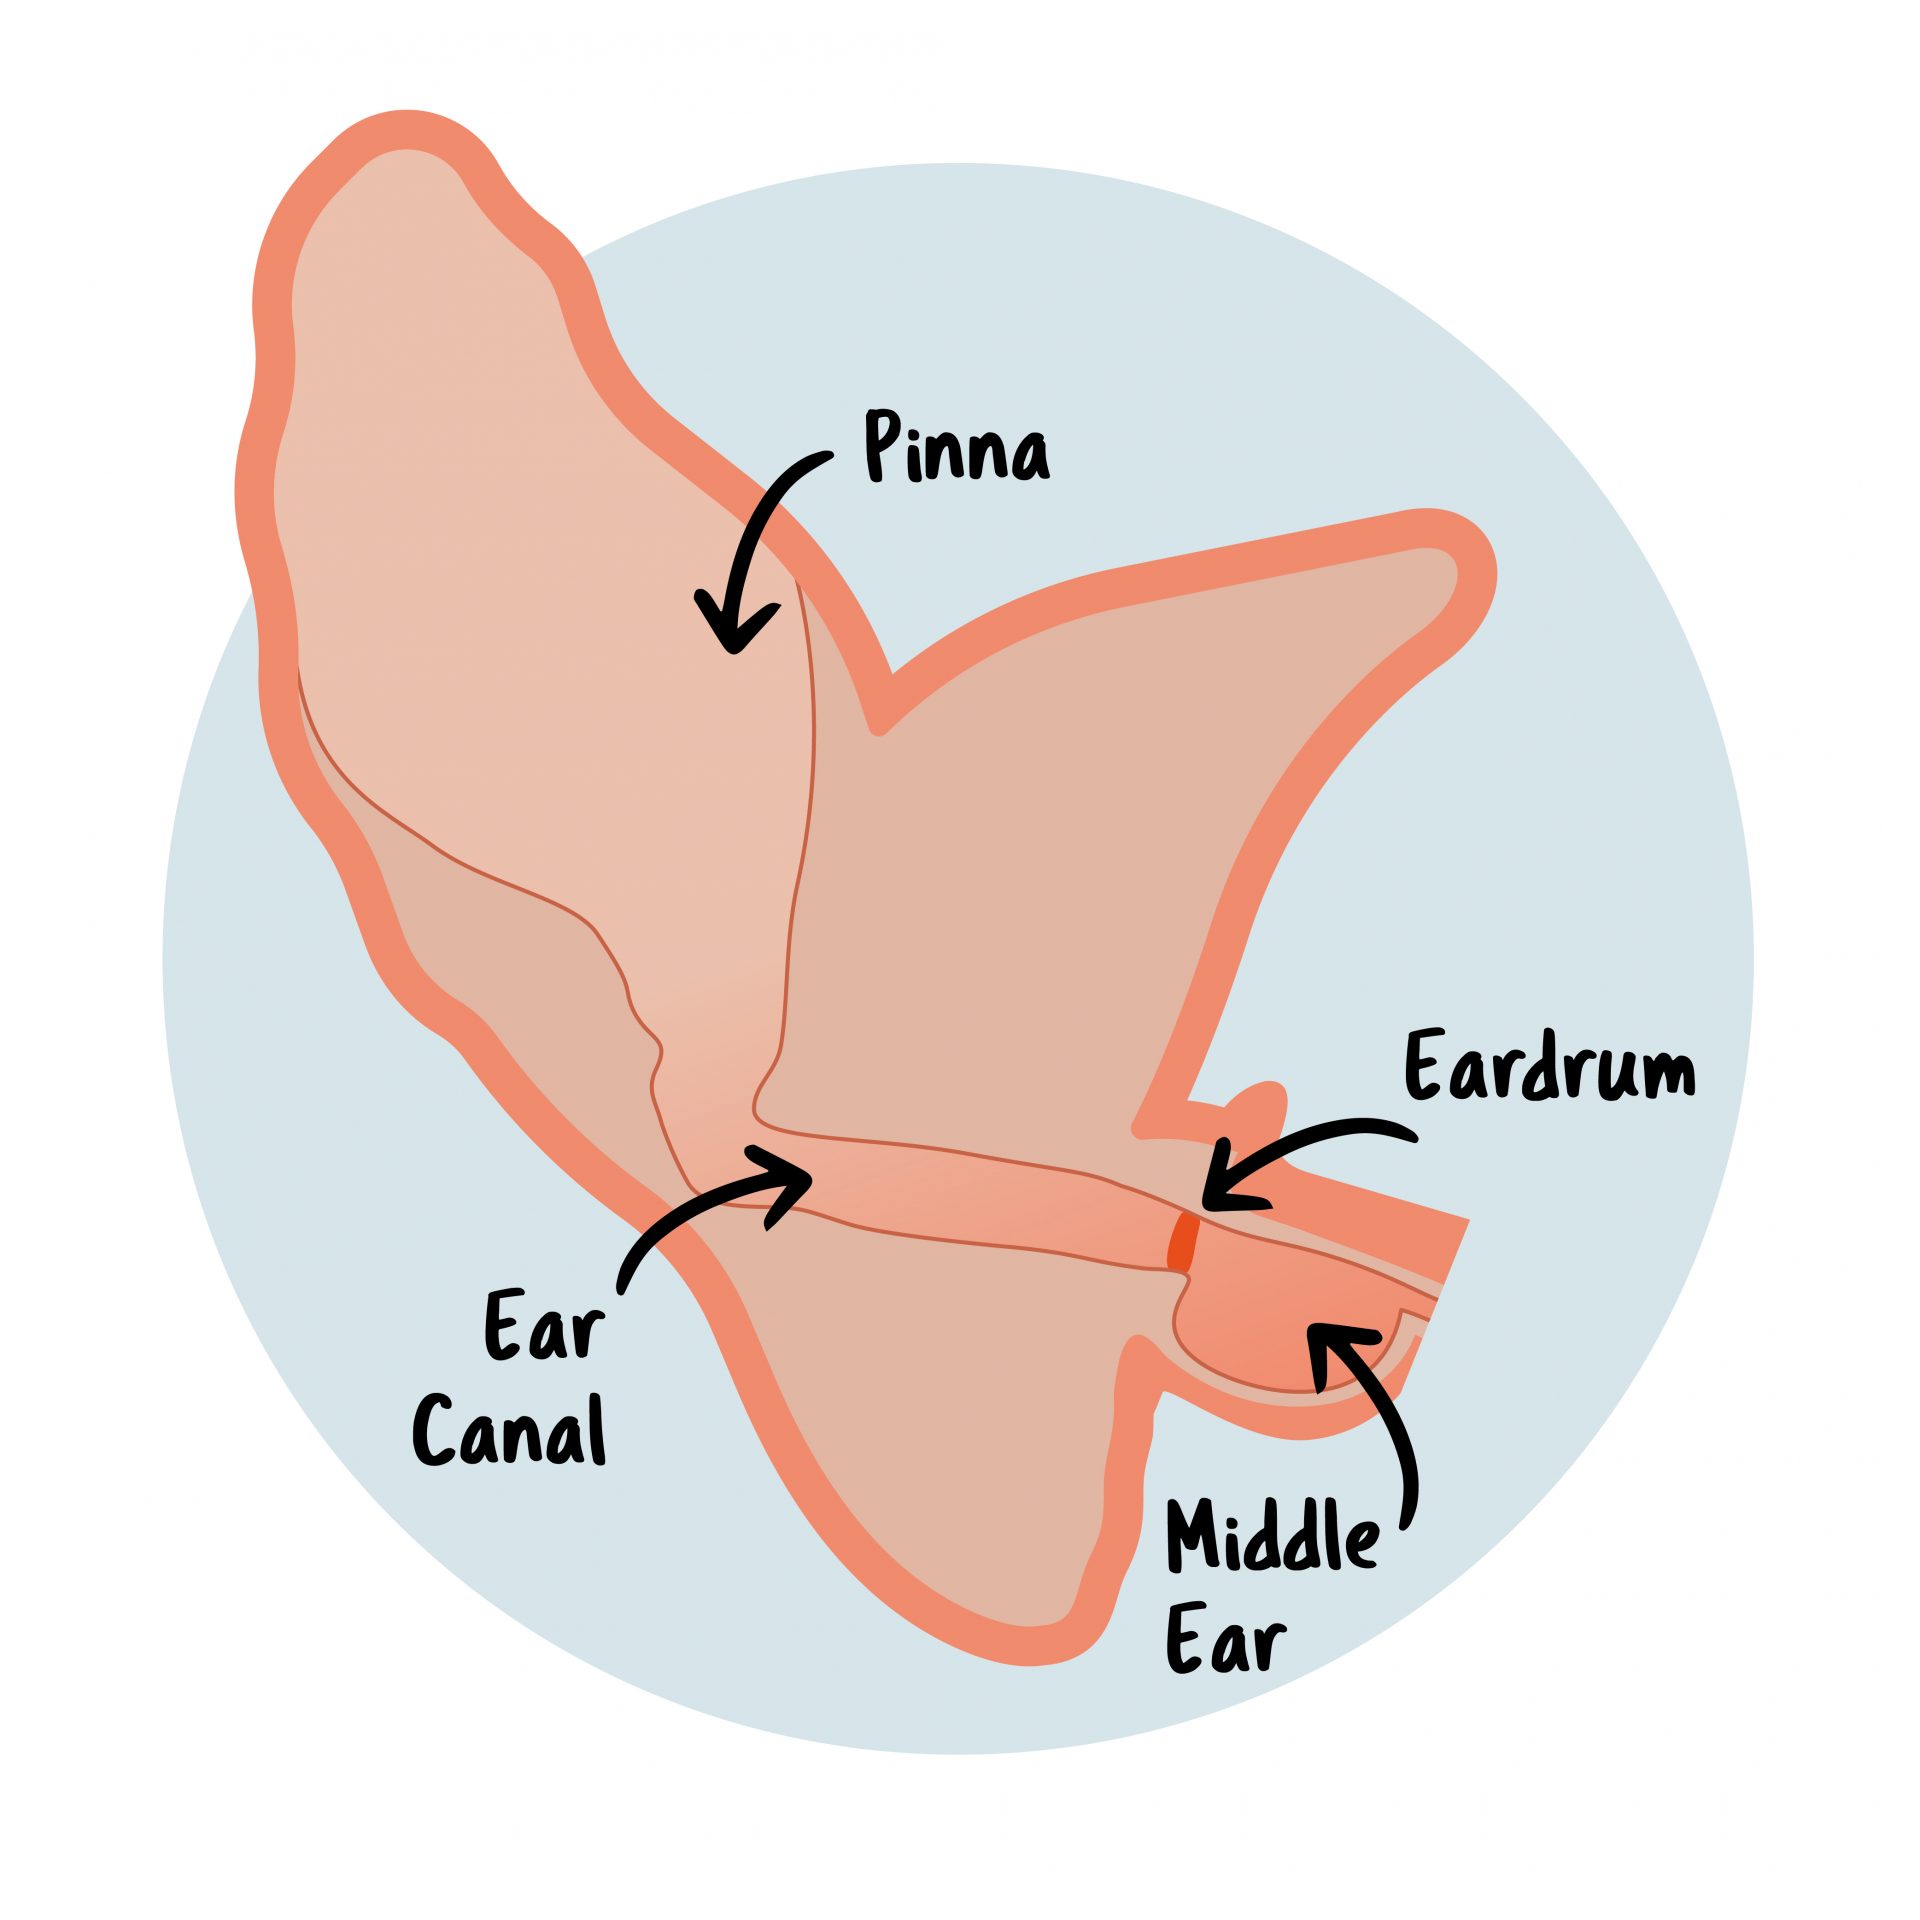
In preparation for treating your dog, you should always aim to apply medicated drops to a clean ear. Watch our video above on how to clean your dog’s ears before applying any drops.

It’s important to consider that your dog may be in some pain or discomfort with its ear and might not respond well to you cleaning/treating the area. Even the calmest, gentle, and most passive dog may react with a struggle, bark, growl, or even bite. To avoid this, be cautious and patient with your dog. For particularly reactive or anxious dogs, you may find it useful to apply a muzzle before the procedure for added safety.

How to easily apply ear drops to your dog

  1. Wait 15 minutes after cleaning your dog’s ears before you begin applying the medicated ear drops.
  2. Check the medication label, including the dose and frequency of application. The instruction sheet supplied with the drops will give you advice on how to use that particular ear treatment.
  3. Make sure that your dog is in a comfortable position. If you have a small dog, positioning them on your lap is a good idea. Otherwise, laying them down on a flat surface or sitting them in front of you can make applying ear drops easier.
  4. Prepare the medication according to the instructions that accompany the bottle. You can roll the bottle in your hand to warm up the liquid beforehand so that it’s not as cold before applying it to the ear.
  5. Whilst holding the pointy end of the ear up, you can introduce the nozzle of the bottle/pipette to the ear canal and carefully begin to apply the number of drops stated on the label. Sometimes it can be difficult to know how much pressure to apply to form a drop, so it can be useful to practice on a piece of kitchen roll first if you are unsure.
  6. Once the drops are applied, you can gently massage around the base of the ear in a circular motion. This helps the medication reach the whole of the ear canal. If your dog is in any discomfort, they may not let you do this – be gentle and patient with them.
  7. After applying the drops, your dog will begin head shaking. Don’t worry – this is normal. Now, move on to the next ear, if it also needs treatment, and repeat!

Treating your dog’s ear infection with antibiotics

When treating your dog with antibiotic ear drops, it’s crucial to adhere to the correct dosage instructions provided to you. Avoid breaks in treatment and be sure to attend your follow-up appointments as advised. As long as you follow these guidelines, you should expect to see your furry friend back to their best in no time!

Dogs can be prone to recurrent ear infections. If your dog has had a flare-up and you have not seen a vet recently, please arrange a check-up before treating at home. Never apply old ear drops that you’ve given to your dog previously without a check-up beforehand – you need to make sure you have enough for a full course of treatment recommended by a vet.

If you are having trouble administering the treatment or you notice a head tilt
developing after using medicated drops that don’t seem to be returning to normal, please contact your local Goddard vet practice or get in touch with our Central Clinical team.

Useful tips for applying ear drops to your dog

  • Help get your dog used to ear drops by presenting them with treats and other items like toys with the treatment bottle around. Over time, your dog will begin to associate the treatment with something positive, rather than a negative outcome. You can try this several times a day to acclimate your dog to the ear drops.
  • Make an effort to message your dog’s ears as regularly as possible. This will get the dog used to you touching their ears and the areas around them, making applying treatments like ear drops more ordinary to the dog.
  • Choose a quiet environment within your home to apply the ear drops. Choosing somewhere with no distractions will help to relax your dog, especially if it can get anxious. This can make the application process much easier.

If you need further advice, book an appointment with your local Goddard vet practice, or get in touch with our Central Clinical Team at 020 8506 9944.

How to apply spot-on flea treatments for dogs

Spot-on treatments are frequently used to treat or prevent a range of parasitic infections that may cause irritation or illness in your cat or dog or illness in you and your family. They usually need to be applied on a regular basis and it’s important to understand how to apply them accurately and safely.

Keeping up with your dog’s worm and flea treatment is important if you want to protect them from parasites.

Always check the label before applying it to your pet to make sure it’s the right one for the pet you are treating, and you are using it at the recommended frequency.

Applying the treatment doesn’t have to be complicated. Watch our step-by-step video or follow the steps below.

Top tip: Don’t forget to remove your dog’s collar before you apply the medicine, as it could get in the way of the treatment working properly.

Guide to applying spot-on flea treatment to your dog

Here at the Goddard Vet Group, we strongly advise using a prescribed monthly spot-on treatment for your dog. You should speak to your vet about the right one for your pet, and make sure that you read the label thoroughly before applying it.

  1. Once you are sure you have the right treatment for your dog, simply remove the tube from the packet, and then unscrew the top and use the end of the lid to open the pipette.
  2. Part the hair and then apply the treatment directly to the skin at the back of your pet’s neck, just above their shoulders. This is so that your pet won’t be able to rub or lick it off. There’s no need to rub it in either, as the treatment will naturally disperse across their skin.
  3. If you need to distract your dog whilst you apply the treatment, you could get some pet food paste for them to lick or ask someone to rub and scratch their ears. Making the experience a calm and positive one will make applying the treatment a lot easier for both you and your dog.
  4. Don’t bathe your pet for 4 days after application and do not allow dogs to go swimming as this may affect insects in the water and will also reduce the efficacy of the treatment.

How do spot-on treatments work?

The natural oils on your dog’s skin work to distribute the medicine around their body. The chemical pesticides then sit on the hair follicles and release continuously even after the initial application.

As well as paralysing and killing fleas within 24 hours, the treatment will also prevent new fleas from emerging in your house.

Helpful tips when applying spot-on treatment to your dog

  • For large dogs, you may have to apply to spot on in 3 places along the back – please check the label directions for the product you are using.
  • If any of the treatment transfers onto you, wash it away with soapy water. The solvent in Spot On treatment may stain or damage certain materials including leather, fabrics, plastics, and finished surfaces. Allow the application to dry before permitting contact with such surfaces.
  • Make sure you make a note of when your pet’s next treatment is next due, so you can keep them protected.
  • For further support in applying your dog’s spot-on treatment, you can watch the video above.

How can Goddard Veterinary Group help?

Many of the most effective anti-parasite products are prescription-only medicines, which means they can only be prescribed by a veterinary surgeon and will not be available in pet shops or through online subscriptions, unless under the prescription of a vet. At an annual health examination, normally at the time of vaccination, one of our vets will assess the risks of a range of parasites to your pet based on their lifestyle, and will recommend products and frequency of application, based on this risk assessment.

Additionally, if your dog has had an adverse reaction to the fleas or the treatment, and you need to see a vet, you can find your local practice here.

Helpful resources

If you would like to know more about parasites and how to reduce the risk to our dogs and family please click on the links below:


Frequently asked questions

Does it matter where you put flea treatment on a dog?

Yes, it does. You need to make sure that you apply the treatment to the skin on a part of the body your dog cannot reach. That’s why we advise the skin on the back of the neck. This is so your dog cannot lick it off and ingest it.

Can I use the same spot-on treatment for cats and dogs?

No. A dog spot-on treatment used on a cat can prove fatal for the cat. Additionally, a cat spot-on treatment for a dog will not come in a high enough dosage, as dogs are normally larger than cats. Always make sure you use the correct treatment for the correct species.

How long does it take for spot-on treatment to work?

The spot-on treatment can take up to 24 hours to completely take effect. However, it’s likely that you will start to see results within a few hours.

How often should spot-on treatment be used?

Most flea treatments will become ineffective after one month, so it’s important that you reapply it on a regular basis. Make sure you read the instructions carefully, as they hold specific information regarding the correct dosage and frequency.

Does spot-on treatment protect my dog from ticks?

Not all spot-on treatments protect against ticks. Your vet may recommend a monthly tablet to replace the monthly Spot-on, or a collar for the warmer times of the year when tick numbers are high, please ask your vet for more information on protecting your dog from ticks and the incidence in your local area, or areas you plan to travel to with your pet. To learn more about ticks, or how to remove them the PDSA has a very useful guide.

Tips on keeping your dog safe in warm weather

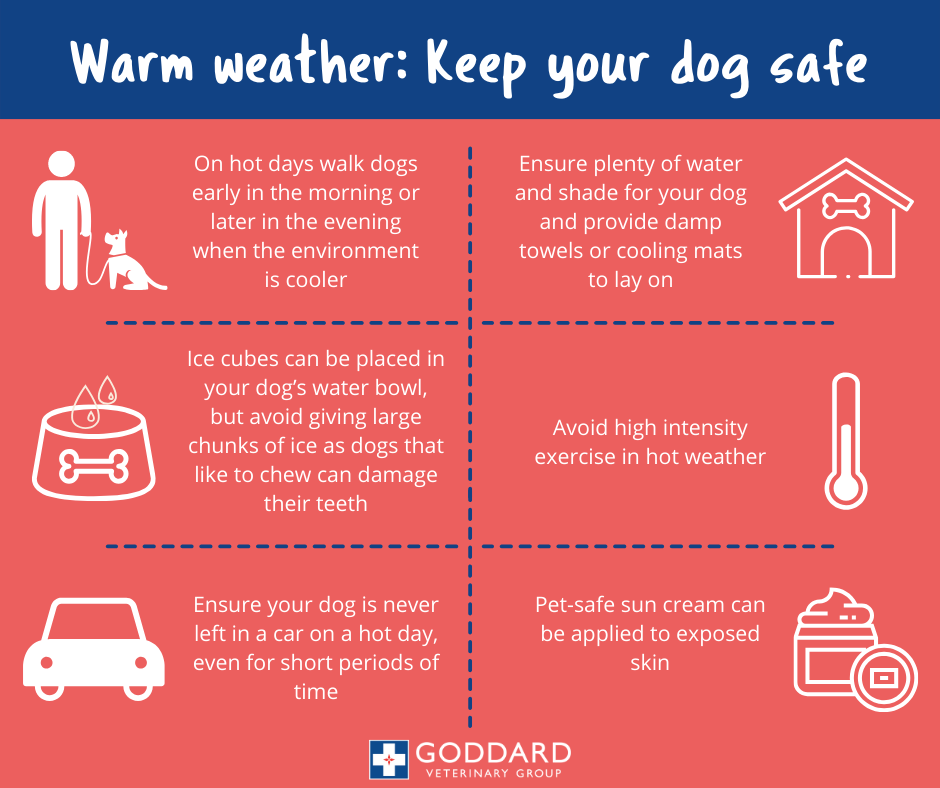
With the weather warming up it’s important to understand the potential dangers heat can cause our four-legged friends. Just like humans, dogs can get heatstroke when they overheat — follow these steps to keep your dog safe.

Tips on keeping your dog safe during warm weather

Are wild mushrooms harmful to dogs?

Ultimately, of course, it depends on the mushroom! However, with an increasingly warm and wet autumn climate, mushroom populations are soaring. In fact, in September 2018 the Veterinary Poisons Information Service (VPIS) actually issued a warning about the problem. Read on to find out if wild mushrooms are harmful to dogs and what signs to watch out for. 

If you think your dog may have eaten an unknown wild mushroom, contact us IMMEDIATELY for advice.


What is a wild mushroom?

This sounds really easy —  but do you actually know what those bulbous masses are? Fungi are a kingdom of life all of their own, as different from plants as plants are from animals. Most fungi live in the environment and form networks of fine fibres growing through the soil. The mushrooms we see are their fruiting bodies, part of their reproductive cycle, which develop spores and then distribute them into the wind to spread where they will.

These fruiting bodies are high in protein and often very nutritious, so make a nice snack for any passing critter. Most fungi accept this as one of those things that, as a non-mobile fungus, one must put up with. However, there are a number that resent their unborn offspring being gobbled up by animals, and produce a range of really quite nasty poisons to deter peckish beasts.


What do wild mushrooms do to dogs?

The majority of the 4000 or so species of UK mushrooms are harmless – they might not taste nice, but they aren’t actually dangerous. However, there are a number that produce toxins called mushroom poisons (interestingly, although very similar poisons produced by moulds are called mycotoxins, the term is not usually used for those produced by the mushroom fruiting bodies themselves). For centuries, if not millennia, the properties of these fungi have been known by healers, botanists and shamens, and used for a range of uses.

In dogs, we tend to see three groups of clinical effects:

Early onset vomiting and/or diarrhoea

These are usually the least harmful types of mushroom – as a general rule of thumb, the earlier the symptoms appear, the less dangerous the mushroom is. This is because it triggers vomiting and purging that remove any unabsorbed toxins from the dog’s system rapidly. If the dog is violently vomiting within six hours of eating the mushroom(s), then although they need to be seen by one of our vets (dehydration and salt imbalances from profuse vomiting can be dangerous in itself), the prognosis is usually fairly good.

Neurological effects

The most famous example is, of course, Psilocybe semilanceata, the “Magic Mushroom”, but there are a number of different psychoactive fungi in the UK. Unfortunately, dogs do not cope well with the effects of the active ingredients and may develop abnormal behaviour (well, of course!), self-injury, abnormal heartbeats and even seizures. In some cases, death may occur due to trauma while under the influence of the hallucinogen (for example, jumping from windows or running into solid objects), while in severe poisonings, the seizures may result in hyperthermia which may cause death from internal overheating (although fortunately this is relatively rare).

Liver and/or kidney damage

Sadly, many of the most dangerous mushrooms do not give easy tell-tail signs of poisoning until much later – possibly too late. These damage may damage the liver or kidneys, typically resulting in symptoms such as lethargy, depression, loss of appetite, increased thirst, increased urination (in kidney failure) and jaundice (in liver failure). Treatment requires intensive supportive therapy and often hospitalisation and the prognosis is guarded.


How do you know if a mushroom is safe or not?

The bottom line is that it’s very hard to tell – many harmless varieties have a poisonous twin that is almost indistinguishable. As a result, we strongly advise you not to let your dog eat wild mushrooms – full stop!